| Zones | 10 on board,32 expandable, XT50 has 20 extra wireless |
| Wireless | Yes |
| Transformer | 16.5 VAC 40 VA |
| Battery | 12 VDC 7.7AH Lead-Acid battery. DO NOT USE GEL CELL BATTERIES |
| Downloadable | Yes |
| Panel Answer | 984 Command, then select top row key for (Pick up) |
| Event Log | Yes, XT30 - 100 Events XT50 - 200 Events (see below on how to view) |
| Partitions | Up to 6 |
| Panics | 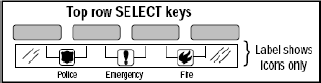 |
| Arming Stay | 1. Enter your code and "PERIM ALL" or "HOME SLEEP AWAY" is displayed. 2. Select PERIM or HOME. 3. If there are any open zones it will show each zone and "OKAY BYPASS STOP" 4. If you press OKAY it will bypass that zone and go to the next one open if any If you choose BYPASS it will bypass all open zones and start arming. If you choose STOP it will cancel the arming. Close the zones and start over. Note: Some places may have Area systems and will not display these. These must be armed by area. |
| Arming Away | 1. Enter your code and "PERIM ALL" or "HOME SLEEP AWAY" is displayed. 2. Select ALL or AWAY. 3. If there are any open zones it will show each zone and "OKAY BYPASS STOP" 4. If you press OKAY it will bypass that zone and go to the next if any If you choose BYPASS it will bypass all open zones and start arming. If you choose STOP it will cancel the arming. Close the zones and start over. Note: Some places may have Area systems and will not display these. These must be armed by area. |
| Disarming | 1. When entry delay is going display will show "ENTER CODE:" 2. Enter your user code and press Command and Keypad displays "ALL SYSTEM OFF" |
| Area Arming | 1. Press the COMMAND key until "ARM DISARM" displays. 2. Select ARM 3. Enter your user code if required. The display reads "ALL? NO YES." 4. Select Yes to arm all areas the code has access to or No to arm only selected areas. 5. If NO is selected, the display will list each area to which the code has access to followed by "NO YES". 5a. Select YES for each area you want to arm. 5b. Select NO for each area you do NOT want to arm. 6. The system displays any faulted and bypassed zones 7. At this point you can force arm or bypass any faulted burglary zones. A zone that is force armed is restored into the system if it later returns to normal. A zone that is bypassed remains bypassed until the system is disarmed. 7a. If a problem exists on any zones, name and problem are shown followed by: "OKAY BYPASS STOP". 7b. Select OKAY to force arm the zone(s) before arming. 7c. Select BYPASS to bypass the zone(s) before arming. Note: 24-hour zones cannot be bypassed. 7d. Select STOP to stop the system from arming. Correct the zone problem(s) and return to step 1. 8. Will show "SYSTEM ON" if at least one area is armed, and "ALL SYSTEM ON" if all areas are armed. 9. The keypad then displays the exit time in seconds and counts down the remaining time: "EXIT: # #" |
| Disarm Area | 1. Press the COMMAND key until "ARM DISARM" displays. Note: During entry delay this process starts at step 3 below. 2. Select DISARM to disarm areas. 3. The keypad displays "ENTER CODE:" . Enter your user code and press COMMAND. The keypad displays ALL? NO YES. 4. Select YES to disarm all areas authorized for your user code or NO to disarm areas individually. 4a. If NO the keypad then displays the name of each area authorized for your code followed by the NO YES display. |
| Instant Arm | While exit delay is displayed press INSTNT. |
| Below commands will require you to enter the User Menu | |
| Entering User Menu | 1. Press Command until "MENU? NO YES" is displayed. 2. Select yes and keypad displays "ENTER CODE: -" 3. Enter your code and press Command. |
| Sensors Reset | 1. Access the User Menu. 2. Press the Command key until "SENSOR RESET?" is displayed. 3. Press any of the 4 select keys at the top. 4. The keypad displays "SENSORS OFF" and 5 seconds later "SENSORS ON" 5. Keypad returns to normal. |
| Bypass | 1. Access the User Menu. 2. Press command until "BYPASS ZONES?" is displayed 3. Press one of the 4 top buttons. 4. Keypad will display "ZONE: - RST BYPS" . 5. Enter the zone number you want to bypass and press BYPS. 6. Display returns to Step 5. Press back to exit. |
| Remove Bypass | 1. Access the User Menu. 2. Press command until "BYPASS ZONES?" is displayed 3. Press one of the 4 top buttons. 4. Will display "ZONE: - RST BYPS" . 5. Enter the zone number you want to remove bypass from and press RST. 6. Display returns to Step 5. Press back to exit. |
| Door Chimes | 1. Access the User Menu. 2. Press command until "ZONE MONITOR?" is displayed. 3. Press any one of the top 4 buttons. 4. Display will read "PERIM ALL NBR" PERIM will place all perimeter zones into Chime. ALL will place all zones to chime. NBR will allow you to place individual zones into chime. |
| System Test | 1. Enter the User Menu. 2. Press comand until "SYSTEM TEST?" is displayed. 3. Press one of the top 4 buttons 4. System will begin testing Siren, Battery and if it can send a signal. |
| Date & Time | 1. Access the User Menu. 2. Press COMMAND until "TIME?" displays. 3. Press one of the top 4 buttons. 4. The keypad displays the current day and time. 5. Press the COMMAND key to display the current date. 6. Press the COMMAND key again to make any changes. 7. The keypad displays "TIME DAY DATE." 8. Select TIME to change the time. 9. The keypad displays "– : AM PM." 10. Enter the current time and select AM or PM. 11. The display changes back to "TIME DAY DATE". 12. Select DAY to change the day of the week. 13. The keypad displays "SUN MON TUE WED". 14. If the current day does not display, press the COMMAND key and Select the correct day. 15. The display changes back to "TIME DAY DATE". 16. Select DATE to change the date. The keypad displays: 17. MONTH: - Enter up to two digits for the month and press COMMAND. 18. DAY: - Enter up to two digits for the day and press COMMAND. 19. YEAR: - Enter up to two digits for the year and press COMMAND. 20. The display returns to TIME DAY DATE. Press the Back Arrow key to exit the User Menu. |
| View Events | 1. Access the User Menu. 2. Press command until "DISPLAY EVENTS?" is displayed. 3. Press any of the 4 select keys at the top and Keypad displays oldest events first 4. Use Command to scroll up and the Arrow key to scroll down. |